I was asked by a reader on Twitter to do an article describing Objective-C for web developers. This is a huge topic, so rather than try to teach you everything, I’m going to point out some similarities and differences between writing web apps and writing iOS apps.
This isn’t a tutorial, but I’m hoping to clear some common misconceptions web developers I’ve known have had about iOS development. I’m going to assume some basic knowlege of object-oriented programming.
We’re going to be pretending that server-side web technologies don’t exist since it will make it explaining the similarities and differences a little easier. This means I’m comparing iOS development to web development that’s completely done in Javascript.
The DOM and UIView
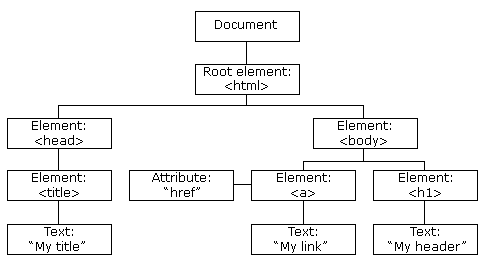
Let’s take a minute to review the HTML Document Object Model, or DOM. The following image, courtesy of W3Schools, represents an example HTML document.

The DOM is a tree structure with a root node as the document. Elements of the DOM have exactly one parent and zero or more children. The elements represent laid out on a webpage as HTML tags. Elements have attributes, like the href of the <a> tag. These attributes define how the elements appear and behave.
The elements themselves can either be laid out in static HTML, or generated completely by Javascript, or somewhere in between. Often, you’ll have lots of static HTML that is modified by Javascript.
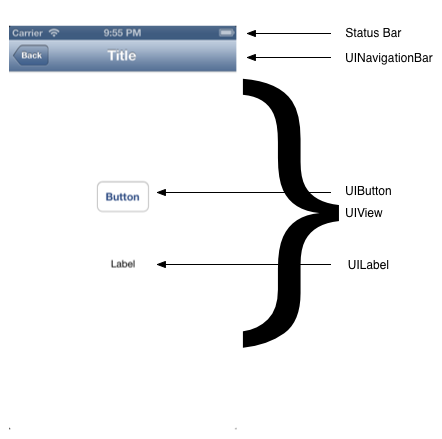
Now let’s take a look at a simple iOS app example.

There isn’t a lot going on here, visually, but there is a lot going on behind the scenes. I’ve labeled the elements with their class name (what kind of element they are).
Certain aspects of the interface, like the status bar, don’t belong to our view hierarchy, but are accessible through special interfaces I’ll touch on later. You can think of these like the scrolls bars on a web page; you don’t create them, but you have access to them so you can modify their appearance.
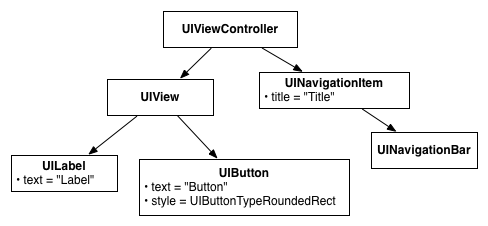
A simplified diagram of what is going on in the above view is laid out below.

The basics are similar - there is a tree hierarchy, like the HTML DOM. Elements are visisble on the screen, and they have attributes that define how they appear and how they behave.
Notice that not everything visible on the screen is visible in the graph, and there are things in the graph that aren’t visible on the screen. As we’ll see, views in iOS apps are more complicated than they appear.
Like in web development, views can be created statically or dynamically using code. Files called .xibs and “Storyboards” (sometimes, by old-schoolers, called .nibs) are used to store “freeze dried” interfaces that are thawed and displayed when the user runs your app. This is like serving a bare HTML file to a browser. Developers can choose to construct their views completely in code, as well, which would be the equivalent to having an HTML file with only a <head> and <body> whose DOM is constructed entirely with Javascript.
Each approach has its benefits and its drawbacks. .xibs are easier to approach for beginners, but more complicated interactions and appearance customizations require the use of code anyway. A common approach is, like with web development, use a little bit of each approach. We’ll assume that we’re using .xibs and take a look at how to change aspects of the view.
But first, I want to touch on positioning. Something that’s baffled web developers I’ve worked with about view layout in iOS is that we have to take very special care about how things are laid out on the screen. There is no “re-flowing” of a view layout when a view resizes (like on orientation change). Everything in the view hierarchy has the equivalent to the CSS position: absolute property.
iOS lets us use things like autoresizing masks and auto layout (new in iOS 6) to define how these objects stretch and slide when the main window changes. Detailing how to use autoresizing masks and auto layout is a topic for another day.
Architecture
In web development, we have the concept of pages that a user visits. In iOS, we make heavy use of the Model View Controller pattern, and so instead of pages, we display discrete chunks of interface to the user in what are called view controllers.
Typically, each instance of a UIViewController has a root view (what you see on the screen) and one set of files containing Objective-C code. These files come in pairs, an .h file (called the header) and a .m file (called the implementation). These are like the codebehind of an ASP page.
iOS organizes the content displayed to the user in these view controllers. Like pages on the web, we typically think of a view controller as a place for the user to accomplish one task or view one piece of content.
When using a web app, a user can click links to navigate to a new page and click the back button to go to a previous page. This has a very strong analogue in the iOS world we call a navigation stack. It’s called a “stack” because viewing new controllers places that controller at the top of the stack, and the user can only see the top controller. The user can tap then back button to return to the controller below it, until they reach the bottom controller, called the root view controller.
In the most common type of iOS app, you’ll see a navigation bar at the top of the screen. Tapping on some element (usually a row of a table view) takes you to the next page, just like a link on a web page. Unlike web apps, however, it is expected that the user will tap the back button.
There is one place where we write code in an iOS application that doesn’t have a equivalent in the web world. This is called the application delegate. This app delegate is a singleton, meaning there is only ever exactly one of them in each application. The app delegate is responsible for launching the application and is used to store code that different view controllers all need access to. For example, the setup for a database used by the application lives in the app delegate.
Because it is conventient and easy to put things there, the app delegate often gets bloated. Keep whatever you put there to a minimum. The specifics of the kinds of things that you should put in the app delegate (Core Data storage, In-App Purchase code, and responding to low-memory warnings) is beyond the scope of this article.
Outlets and Actions
Elements on the screen have attributes which are accessible in code, like how Javascript can set and read attributes of HTML elements on a page.
In Javascript, elements in the DOM are accessible via getElementsByClassName or getElementByID. In Objective-C, you can access views with a similar approach, but we typically opt to store references to these views as instance variables of a view controller. We access and change the properties of views within our hierarchy by using these instance variables.
In Objective-C, instance variables are declared either in the header or implementation file between brace brackets after the keywork @interface or @implementation, respectively.
@implementation MyViewController : UIViewController
{
    UIButton *myButton;
}
Here we see an instance variable of a UIButton. However, since we’re using .xibs or Storyboards, there’s an additional step we need to do in order to access this button. Put the keyboard IBOutlet in front of the instance variable declaration.
@implementation MyViewController : UIViewController
{
    IBOutlet UIButton *myButton;
}
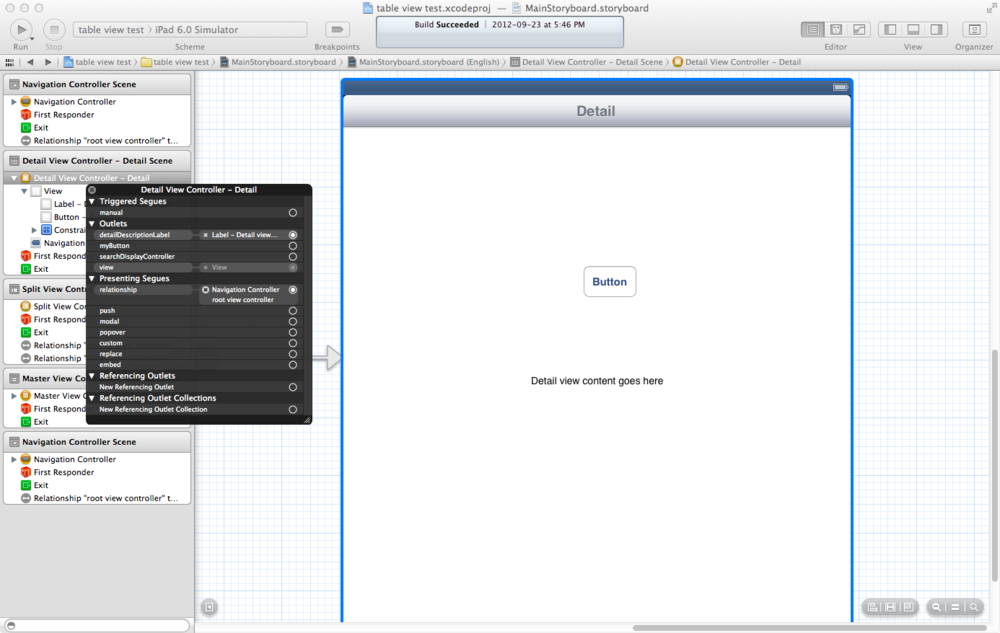
IBOutlet is a slightly anachronistic keyword that was born when a separate program, called Interface Builder, was used to lay out interface files. In the interface file (either the .xib or Storyboard), option-click the view controller in the left pane to get the view controller’s list of outlets. Drag from the circle beside myButton onto the button on the view. That’s it!

That is only half the story. Now that you can access and modify views in your hierarchy, you need to know where to put code to do it. There are two places.
First, UIViewController has several methods that you (may) override in your view controllers. These are called during documented events. This is a lot like attaching methods onto events in Javascript, like whena document has loaded. For example, the method viewDidLoad is called once all the outlets have been set (the interface has been “thawed”), so it’s often used to customize their appearance. viewDidAppear: is called when a view has appeared, and so on. Check the UIViewController class reference for a list of all of these methods.
For example, the following code would customize the title of the button once the view has been loaded.
-(void)viewDidLoad
{
    [super viewDidLoad];

    [myButton setTitle:@"This is my button title" forState:UIControlStateNormal];
}
The other place to put code is in methods that respond to user interaction. This is very much like using Javascript to attach methods to events, like onClick. These methods are where the bulk of Objective-C code is written. Methods that are connected to .xibs and Storyboards have to return a specific type: IBAction. We connect these IBAction outlets to controls in the view the same way we connected the button.
-(IBAction)myButtonWasPressed
{
    NSLog(@"My button was pressed!");
}
Conclusion
So those are the basics. We’ve covered the similarities and differences of iOS and Web development, where code lives in an iOS project, and how to access members of the view hierarchy. If you have any other suggestions for blog articles, reach out to me on twitter.